Babel & Webpack Fundamentals
How the front-end code we write ends up being executed when visitors use our web-app
Apr 25, 2021

Babel & Webpack Fundamentals
How the front-end code we write ends up being executed when visitors use our web-app
Apr 25, 2021
This post isn't directly about website speed. Instead, it touches upon the fundamentals of Babel, Webpack and all things related. This is to help us understand how the front-end JavaScript code that we write ends up being executed when visitors use our web-app. Better understanding of this shall, hopefully help write better (and faster) web-apps.
Introduction
Before talking about Babel or Webpack, let's quickly look at basics of some important parts of the JavaScript ecosystem in this context:
Node
Node is JavaScript runtime built on top of Chrome's V8 JavaScript engine. With Node, we can execute JavaScript on the server-side to serve client requests. So, the Javascript engine used by Chrome has been ported to Node to enable execution of JavaScript on the server-side. Node's capability to execute JavaScript has enabled SSR (Server-side Rendering) of web-apps that are developed to run within browsers.
The V8 engine underneath the Node server is regularly updated with newer Node versions. This ensures that new JavaScript features also become available on newer Node versions. However, there are always some differences in the JavaScript that can natively run on the browser vs that on the Node server. We shall delve into this in more detail in the later sections.
CommonJS
Historically, CommonJS was a standard derived to bring modules into the JavaScript ecosystem. This had become necessary as JavaScript was starting to be used to write large web-apps outside the browser. What we commonly call CommonJS today is Node's version of that CommonJS standard. This executes natively within Node but not on browsers. The require('libname') calls within our code is a CommonJS feature. We use these for server-side JavaScript because Node (atleast upto v12) doesn't natively support ES6 imports out-of-the-box.
So, while Node leverages browser's V8 JavaScript engine, there are always differences in the JavaScript capabilities supported by Node (server-side) and browsers (client-side).
ES6 / ES2015
ES6 (or ES 2015) is a JavaScript specification that brought in various JavaScript features like clases, arrow functions, import statements and promises. As of today, majority of popular browsers support ES6 JavaScript features. This means that most browsers can natively execute ES6 JavaScript code. However, few browsers like IE, UC Browser & Opera Mini do not support ES6 (as of April 2020). Also, Node doesn't support every ES6 feature out-of-the-box. As a result, we require polyfills to run ES6+ JavaScript anywhere.
While ES6 was a major JavaScript update & was released in 2015, there has been an ES standards release every year post 2015. Each of these vary in browser support.
Babel
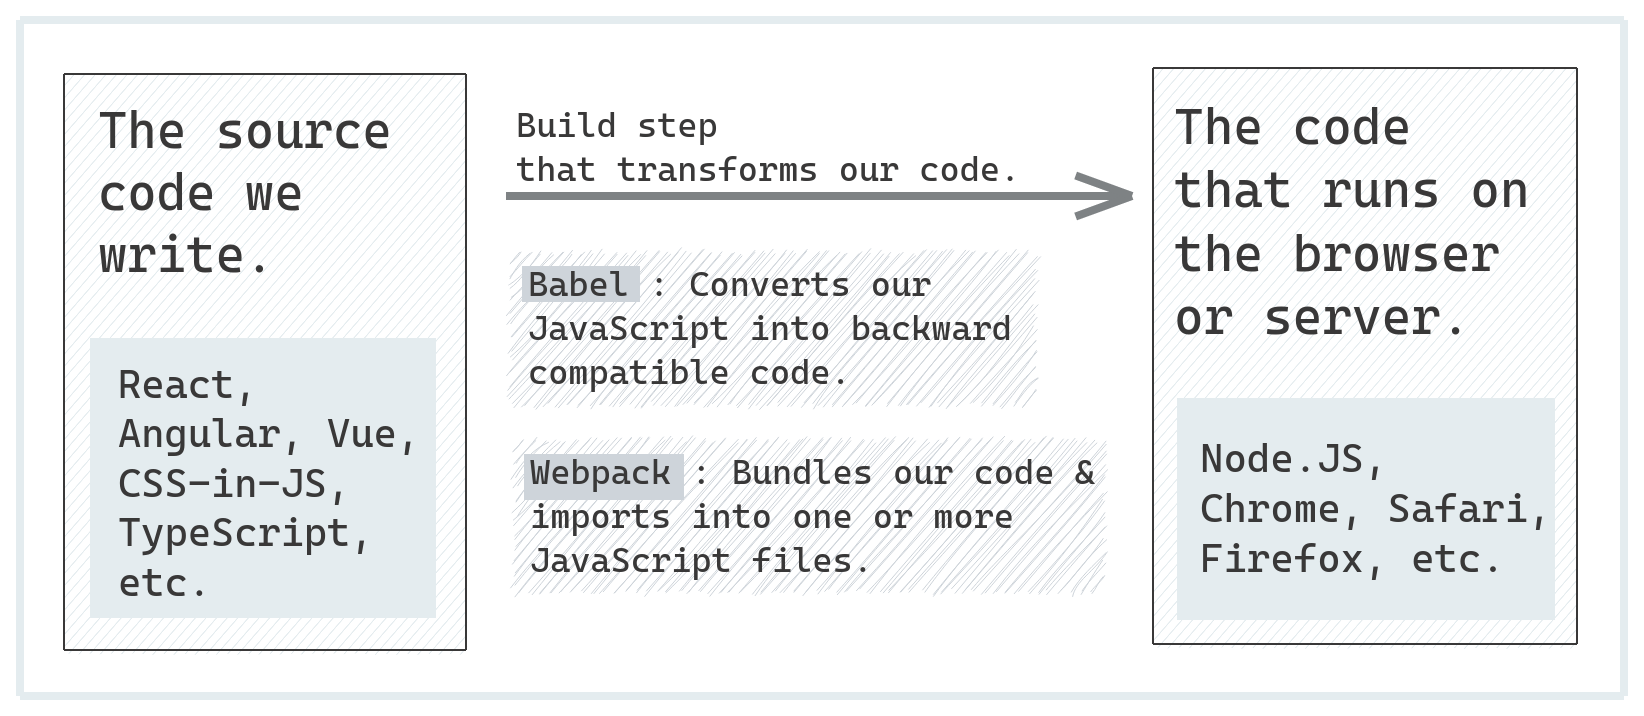
Babel is a JavaScript compiler that converts ES6+ JavaScript code into backwards compatible JavaScript. This enables modern JavaScript code to run on any browser. Babel allows us to specify target environment and it creates compatible JavaScript version for that target environment. It can also transform framework specific JavaScript (like React JSX) into target browser-compatible JavaScript.
To understand Babel further, let's see it in action:
test.js) with an arrow function (an ES6 feature)[1, 2, 3, 4, 5].map(n => console.log(n))
test.js is just created.npm install --save-dev @babel/core @babel/clitest.jsnpx babel test.jstest.js (same as the source).[1, 2, 3, 4, 5].map(n => console.log(n));@babel/preset-env for our little test:
@babel/preset-env in the same folder as earliernpm install --save-dev @babel/preset-env.babelrc to specify babel to use this preset.{
"presets": ["@babel/preset-env"]
}
test.js again:npx babel test.js
"use strict";
[1, 2, 3, 4, 5].map(function (n) {
  return console.log(n);
});
What happened above is that a bunch of Babel plugins transpiled our code with an ES6 feature into backward compatible JavaScript. @babel/preset-env allows us to specify target environment for which to transpile. Not specifying one above caused default target environment to be picked. You can try a few @babel/preset-env targets configurations to see how it affects the babel output.
Babel Polyfill
With Babel Polyfill library, you can simply import @babel/polyfill and it will bring in polyfills for all the ES6+ features into your bundle. While this is the simplest way to deal with polyfills, it also means your JavaScript bundle will include polyfills for all the ES6+ features. So, the bundle for following code snippet will include 30 KB gzipped for babel polyfills with one line of your code:
import "@babel/polyfill";
[1, 2, 3, 4, 5].map(n => console.log(n));
Because simply importing @babel/polyfill brings in polyfills for all ES6+ features, it is not the recommended way to setup Babel. Instead, @babel/polyfill should be setup via @babel/preset-env settings to ensures only needed polyfills become part of your JavaScript bundle.
Simply importing @babel/polyfill shall bring polyfill for all ES6+ features into your javaScript bundle. Instead, setup @babel/preset-env with right configuration to ensure only needed polyfills become part of your JavaScript bundle.
Decently Optimal Babel Polyfill Setup
All things stated, below is my safe yet decently optimal babel polyfill recommended setup:
@babel/preset-env with useBuiltIns: "entry"@babel/polyfill or core-js + regenerator-runtime at the beginning of entry-point.{
"presets": [
[
"@babel/preset-env",
{
"useBuiltIns": "entry"
}
]
]
}
To optimize the above further:
@babel/preset-env target environments in sync with your visitors browser usage.Babel Beyond Backward Compatible JavaScript
Many Babel plugins do things beyond transpiling source to backward compatible JavaScript. These plugins benefit from either parsing the source or transforming it during the build process. For example:
Webpack
Webpack is a static module bundler. It bundles our source code into a JavaScript file. It does so by starting from an entry-point that we specify to Webpack and building a dependency graph based on imports and requires. Since it does so without actually executing the code, it's dependency analysis is static in nature. It's output is one or more JavaScript files. It is these outputted JS bundles that actually load on visitors' browsers when they access our web-app.
To perform bundling, we provide Webpack with configuration. This configuration shall be written as Node CommonJS module (since webpack runs within Node to do bundling). At it's simplest, we just need to provide an entry point, an output folder and set the build mode (to development or production).
Let's put it in action to understand this better. Let's say we have a bunch of source-code files as following:
Here's our index.js:
import { square, cube } from './modules/math.js';
[1, 2, 3, 4, 5].map((n) => {
        let ele = document.createElement('div');
        ele.innerHTML = 'Element Square = ' + square(n) + ' and Cube = ' + cube(n);
        ele.className = 'box';
        document.body.append(ele);
});
And here's our modules/math.js:
export function square(n)
{
        return n*n;
}
export function cube(n)
{
        return n*n*n;
}
Finally, here's our index.html that shall load & execute our code in browser:
<!doctype html>
<html lang="en">
<body>
	<script src="dist/test.bundle.js"></script>
	</script>
</body>
</html>
To create a single test.bundle.js for our JavaScript source code, we shall have the following (very simple) webpack configuration (within webpack.config.js):
module.exports = {
  mode: 'production',
  entry: './index.js',
  output: {
    path: '/opt/babeltest/dist',
    filename: 'test.bundle.js'
  }
};
We can run webpack-cli to generate test.bundle.js
npm install --save-dev webpack-cli
webpack --config webpack.config.js
Webpack bundler generated test.bundle.js of size ~0.75 KB for me (~4 KB if mode is development). Loading index.html in our browser shall now load & execute the test.bundle.js. In this way, Webpack can bundle multiple source files into a single JS file to load on the browser.
Webpack Loaders
Let's build further on our source-code example above by adding a style.css to style our boxes:
.box {
  color: white;
  background-color: lightsalmon;
  border: 10px solid salmon;
}
And let's import it within our index.js:
import { square, cube } from './modules/math.js';
import './style.css'
[1, 2, 3, 4, 5].map((n) => {
        let ele = document.createElement('div');
        ele.innerHTML = 'Element Square = ' + square(n) + ' and Cube = ' + cube(n);
        ele.className = 'box';
        document.body.append(ele);
});
Running webpack now would lead to an error Module parse failed: Unexpected token (1:0). This is because it treats style.css as a JavaScript module. To let webpack know to treat CSS files differently, we shall use style-loader and css-loader:
npm install --save-dev style-loader css-loaderWe shall update our webpack.config.js to use these two loaders. The below configuration tells webpack to first use style-loader and then css-loader for files that end with .css:
module.exports = {
  mode: 'production',
  entry: './index.js',
  output: {
    path: '/opt/babeltest/dist',
    filename: 'test.bundle.js'
  },
  module: {
    rules: [
      {
        test: /\.css$/i,
        use: ['style-loader', 'css-loader'],
      },
    ],
  },
};
This shall generate a single test.bundle.js with required styling CSS within our test.bundle.js file.
Like we saw above, webpack loaders are transformations that allow us to tell Webpack how to load a certain import. There are different loaders for different file types (some are listed here). Infact, the way we specify Webpack to use babel is through a loader called babel-loader. So, it is during loading of source code for bundling, that babel performs it's transpilation. Extending our webpack configuration, below shall ensure our code is babel transpiled (please do a npm install --save-dev babel-loader in prior):
module.exports = {
  mode: 'production',
  entry: './index.js',
  output: {
    path: '/opt/babeltest/dist',
    filename: 'test.bundle.js'
  },
  module: {
    rules: [
        {
        test: /\.js$/i,
        use: [{ loader: 'babel-loader', options: {babelrc:true}}],
        },
      {
        test: /\.css$/i,
        use: ['style-loader', 'css-loader'],
      },
    ],
  },
};
Webpack Plugins
Plugins are transformations that allow us to tell Webpack how to output our bundles. So, while loaders work on individual source file-level, plugins work on output chunks or bundle files levels. Plugins can change how bundles are created.
So, for our earlier example, if we want to extract CSS out of the test.bundle.js into a separate CSS file (say test.bundle.css) - we need to use a Webpack plugin to do so. mini-css-extract-plugin does exactly that and below webpack configuration change demonstrates how we specify plugins (please install the plugin via command npm install --save-dev mini-css-extract-plugin first) to control our output bundles:
const MiniCssExtractPlugin = require('mini-css-extract-plugin');
module.exports = {
  mode: 'production',
  entry: './index.js',
  output: {
    path: '/opt/babeltest/dist',
    filename: 'test.bundle.js'
  },
  plugins: [new MiniCssExtractPlugin({filename:'test.bundle.css'})],
  module: {
    rules: [
        {
        test: /\.js$/i,
        use: [{ loader: 'babel-loader', options: {babelrc:true}}],
        },
      {
        test: /\.css$/i,
        use: [MiniCssExtractPlugin.loader, 'css-loader'],
      },
    ],
  },
};
Webpack plugin ecosystem has a large number of plugins that can help you control exactly how you would like to bundle & deliver your code. To make sure your output code is minified and/or mangled, there's terser-webpack-plugin. To automate creation of HTML that serves your JS bundles, there's html-webpack-plugin. To generate service-worker with precaching generated JS bundles, there's sw-precache-webpack-plugin. Here's a nice list of some of the common webpack plugins.
Webpack Optimization
Optimization is a set of transformations Webpack runs during bundling on it's own based on the selected mode (`production` or `development`). For example, minification is one optimization that Webpack performs out of the box for `production` mode. However, we can override mode-dependent defaults for these optimizations if needed. So, if we want to not minify or select a non-default minnification tool, we can do so via webpack configuration.
An important optimization that webpack performs by default is splitting output bundle into multiple chunks (also known as code splitting). It achieves this via split-chunks-plugin. This plugin leverages webpack's static analysis and splits the output JS bundle in a way that only route-specific JS be loaded for a given route. By configuring split-chunks-plugin adequately with the right code-splitting within your front-end code can substantially reduce the amount of JavaScript you load for your web-app to work.
Conclusion
Leveraging boilerplates or utilities like create-react-app enables us to start coding as soon as possible without worrying about build & configuration. While this helps fast development, it often leaves a big hole in our understanding of how the code we write is transformed into the code that runs on our visitors' browsers. Understanding babel, webpack & related parts of the ecosystem well helps us understand this a lot better. This, in turn, ensures that we deliver better & faster web-apps.

Also Read